Thursday, April 4, 2013

NUMB3RS

You remember those activities from childhood.  The ones where there were 2 pictures and you had to tell what was different.  That's sort of where this weeks challenge started.  We began our conversation with "let's take photos of the same numbers but in different ways!"   Which quickly turned in to "that's gonna take forever."  lol  So we decided to just practice our manual shooting skills taking images of whatever numbers happened to come our way.  I had actually thought we would end up with another Sisters-from-different-mister post.  But turns out we did not.  Lucky you.  :)

Here's the latest from Erin:
I am so excited to finally share a few images from the baseball field.  I take so many pictures from every baseball game but tried to turn a little focus to the "numbers" for this week's challenge.  This weekend my son's team and my nephew's team played each other in what turned out to be a very exciting game!  And I was just as thrilled that the weather was finally cooperating, and we weren't frozen by the end of the game :-)  Here were a few of the fun number shots. 


And here are the cousins...


And we are thankful that they don't seem upset at the end of the game, no matter the outcome.
                                 

Here's the latest from Vicki
Ok first my nephews MUST stop growing up.  This is just to much to watch.  They are supposed to be little toddlers running around asking for juice.  Not these joke-cracking, uniform wearing, super talented little ball players!

Now onto the numbers pics.  So I thought for a few days about how to make this not so boring.  My backyard is not going to cut it.  Then I realized I had an upcoming trip to visit my twin (really my younger sister, but we like to think of ourselves as twins) at her place down in Wilmington.  Perfect, everything looks better at the beach, right?   So day 1 of shooting was beautiful.  The sky was crystal clear and I set out about an hour before sunset to snap a few pics of my kids at the marina.  Camera set to a "sunny 16" aperture, ISO at 400, and shutter speed at 320.


That pretty lady number 992071 is captained by my sister's better half, Mr. Mike White.  If you are in Wrightsville Beach this summer check out his sport fishing business, Offshore Account Charters.  They book full or half day trips all summer long.  You won't be disappointed.

However, I was when I started snapping the following day at the beach and didn't change my camera settings.  Drawback #1 to shooting manual, you ALWAYS have to check your settings.  None of this point and shoot business.  So I had a few blown-out pics before I realized my mistakes and took them all over again.  This day was super overcast and barely any direct sun at all.  My settings were 2.8 aperture, ISO 400, and shutter speed of 640.  I did do some post-processing just because they were so blah....and still kinda are.


That's all for this week!  The moral of the story here is that you must practice.  Find subjects, any subjects and just keep shooting!  Next time we are back with "emotion".  Should make for a fun post!

Write us anytime with suggestions or comments at, hautopblog@gmail.com


Monday, March 25, 2013

Don't forget to bring your "A" game

That should pretty much be the mantra of the Hautop family.  You see they are all over-achievers and I like to think that they married well.  :)  So well in fact that 2 of the 3 "married-a-Hautop"ers have recently hit the big screen.  Yes that's right, thanks to a collaboration between Zach Schabot and Erin Hautop our blog has been featured in the book "My Brand New Home".  My incredibly talented brother-in-law wrote a children's book based on the events that take place when building a new home.  It is a wonderful resource to help explain the process and includes fun activities related to moving.  A really great idea!  Many of the photographs found in the book are taken by our very own Erin Hautop!  Flip open the cover and what do you see in the credits,  Take Two!  So cool to see an idea come to life and watch others enjoy the work you have done.  Congrats, Zach for making this happen!  And congrats Erin for taking this blog to the next level!  You both rock and I'm so proud to call you family. 

Now I should probably get back to work on my own next great idea before I'm kicked out.....  lol


Wednesday, March 13, 2013

trying to keep up

The last two weeks have been full of lots of fun and excitement...and TONS more pictures!  Baseball season is officially underway so our family is spending lots of time on the West Raleigh baseball fields.  That means that my camera is now back in action capturing all those action shots for the team!  I have already taken images from a couple of the practices and am gearing up for the games to start which will have me out there two times a week!!  I will do my best this season to post some of my favorite images from the field and then talk a little about my settings (hopefully it will help reinforce what we learned from the shutter speed lesson :-).  I addition to baseball, I have also taken pics for a few folks this week...headshots, a family shoot and the final pics for a kids clothing company.  The headshots were for my awesome blog partner and the family photo shoot was for my first repeat customer!!  Below are a few images that I have not yet shared from both of those shoots.

  The last photo shoot this week was the final model for the spitter spatter clothing line.  You probably remember that I posted a few of the images from the first shoot a couple months ago.  The site is finally up and running and hopefully the baby girl image will be added soon.  But one of my favorite images from the session doesn't focus on the clothing but does show off this beautiful little girl.  Hope you enjoy and please check out spitter spatter at:

 http://www.spitterspatter.com/

Finally, I wanted to share some fun and exciting news.  You may have noticed the watermark on the last image and were wondering what it was all about.  I have decided, after lots of consideration, to start a business that would include my photography.  I have just created the facebook page and you can find it under studio BECK.  You may notice my husband make a appearance on the site with his fun creative talents from time to time, but for now it will be a lot of photography.  I would love for you to contact me if you are interested in having photos taken and of course to like my page on facebook if you like what you see.  Vicki and I will still continue to run the blog together and I will have much of my personal photography and of course my photos challenge images here!!  Thanks for looking and hope to hear from you soon.

Monday, March 4, 2013

The last post....

....of this most boring yet important series on basics.  Hopefully you weren't thinking last post ever.  That would just be terrible.  To think of all the readers never to hear from us again.  :(  lol  You're not getting rid of us that easy people.  Now on to ISO!!!


Erin's take away this week.....
Alrighty guys and gals...I am going to do my best to try and explain the benefits, downfalls, and uses for the ISO setting on your camera.  At a high level, the ISO is the digital equivalent of film speed (for those of you who remember the days of film :-).  If you were planning to take outdoor, full sun pictures, you would buy 100 speed film whereas if you were planning to be inside, then you would go for 400 or 800.  Same is true for digital cameras, but the benefit of course is that you can change the ISO setting from one picture to the next without having to waste a whole roll of film!  I have a series of 4 images all taken at different ISO settings.  For each image, I kept the aperture at 2.8.

 This image was shot at ISO 100.  You can notice that the image is blurry and that is because I am inside and at this low ISO setting, the camera did not have enough light hitting the sensor to give me a high enough shutter speed to hand-hold the camera.  The shutter speed here was actually 1/6.
 This image was shot at ISO 500 which allowed my shutter speed to improve to 1/30.  I still find that this shutter speed is too slow to hand hold the camera and the image still looks a little blurry because of it (but definitely better than the first image)
 I dramatically increased the ISO in this image to 1600.  You can notice that the globe is much better focused because my shutter speeds increased to 1/100...a much better speed for hand holding the camera.  However, you do start to see the trade off of raising your ISO.  If you look closely at the background, the grey area is starting to look grainy.  When you raise your ISO high, you run the risk of adding that grainy look to your image.  Better and more expensive cameras have a greater number of ISO settings available and do a better job of minimizing the grain in your picture.
This last image was shot at an ISO of 4000.  My shutter speeds improved further to 1/250 but you can see that I also picked up much more grain in the image.  Generally speaking, I would chose to use my flash in a situation where I had to raise the ISO too high.  Generally speaking, I hate the way that flash images look but would rather have the pic look "flashy" than to make it look too grainy. 

So, as you can see from all of these images, when I raised my ISO I was able to get faster shutter speeds.  I find that adjustments to my ISO setting is a necessity in lower lighting situations.  But you have to remember that raising it too much comes with a price...grainier pics.  If you all remember me talking about my frustration with photographing my son's basketball games (part 1 of our motion section), I was complaining about the lighting in the gym being so poor that I was forced to raise my ISO to the max on my camera to get my shutter speeds high enough to stop motion. And because I had to raise them to the max, I was really disappointed with the quality of the image.  The gym was also not the time to put a flash on my camera so I did something I almost never do...I left my camera at home :(.

Hope this helps explain a little but I encourage you to all go out and practice.  The best way to really "get it" is by doing it yourself. 


Vicki's take away this week....
Here's the deal.  I never really liked to study that much in school.  I was more of the fly by the seat of your pants, cram it all in at once, fake it till you make it, kinda student.  So my lessons are more of "on the job" type learnings that just come from repitition and trying new things.  I like to try something several different ways, put them all together, and then compare.  Which one do I like best? Why is it that way?  Ok, now let's try something else.  So  my advice on tackling this topic is to find something you want to take a picture of and then play with your ISO setting.  I'll admit that for the longest time I let my external flash do a lot of work for me.  Relying on its awesomeness to compensate for what I did not understand on my camera.  The more I become comfortable with my camera settings (and this has been over the course of 3 years) the less I need my flash.  Now don't get me wrong, there are many times when an external flash is crucial.  But there are also times when you can manipulate natural light to work for you and get a similar result.  Some would argue an even better result.  Natural light is almost always more flattering than a giant beam of direct light coming straight at you! 

For these photos I kept my Shutter Speed at 1/200 and Aperture at 2.8 and used NO flash.  I shot in manual mode and moved my ISO around from 100 to 3200.  Here's what happened....

ISO 100                 ISO 400
 
ISO  1000                        ISO 3200
 
 
These pictures were taken in a spare bedroom with no overhead light and only a half open window.  As Erin said, the more you raise your ISO the more grain you will see.  But if you are in a low-light situation it may be your only choice.  For the average shot I usually leave my ISO somewhere around 400 and make the adjustments in my Shutter Speed and Aperture.  Those changes are often made with fewer "key strokes" and are something you can do on the fly.  But if in the future you are snapping pictures in a church or on a cloudy day try playing with the ISO.  You may just get that shot after all.  :)


This concludes our review on the basics!!!  (Picture confetti falling from the ceiling)  Next week tune in for our ALL MANUAL shoot.  Scary, I know.  But we are getting bold and working our next seesion in full control.    Hey, every accomplishment starts with the decision to TRY.  And that's exactly what we are going to do.
 
Hit us up on email with your comments people!!  hautopblog@gmail.com  We would LOVE to hear from you.  :)


Friday, February 22, 2013

Aperture and the movie ted....

Our second lesson of the "back to basics" series is on Aperture.  It's nice every once and a while to review what you think you already know.  I find that most often I get more out of a lesson or story the second time around.  Especially movies, for instance the movie "ted".  I had the pleasure of watching that beauty three times.  And each time I picked up on more and more awful parts that I had fortunately missed the previous viewing.  How does this relate to Aperture?  It doesn't.  Well kind of, what I mean to say is hopefully if you know a little about aperture you'll know a little more after this blog.  Or if you didn't then it's a good starting point. 
 
Ok, lets start with Erin.....
I don't know about you, but I sure am ready for spring to arrive!!  We have more "threatening" winter weather and once again schools have decided to open on a delay!  It was the best news when I was a kid but now that I am officially "old" it is simply a huge pain in the booty :-)  So, as I was trying to find a subject for this week's challenge I found myself looking longingly at the one sign of spring in our yard...tiny little white flowers on a scraggly shrub.  Not much to look at but it leaves me clinging to hope for more beauty to arrive!!  Anyway, I took several images of this poor little shrub to try and demonstrate the impact that changing your aperture can have on your pictures.  Before talking about the images, I should tell you that I did take the pictures with my 70-200mm,  2.8 lens.

This first image was shot at an aperture of 2.8 and the second image was set to an aperture of 18.

 So, what you can see immediately is that the image with the lower aperture (2.8) has most of the background out of focus while the image with the high aperture (18) has more of the background in focus.  So, if you want those fun "background out of focus" pictures all you need to do is lower your aperture.  Sounds easy enough, right?  Well, here is the one thing to keep in mind...your aperture is dependent on your lens (not your camera).  If you have a intro level DSLR camera with a kit lens (the lens that came with the camera), then you likely will not be able to lower your aperture to 2.8 like I did in the first image.  Sadly, you will have to buy another lens...sorry to be the bearer of bad news!  But you can still take time to lower your aperture as much as your lens will allow and shoot away :-)
As I have been learning more about photography, I have have found that aperture priority mode (Av on my canon) has been my new friend.  I shoot in this mode a great deal of the time because it allows me to easily change and control my aperture.  The one time I will caution you to change from this mode is when you are using a flash outside...you will end up with a freakishly white image.  

Now before I completely leave winter behind, I wanted to share my two beautiful kiddos enjoying the winter weather!!  Thanks for reading :-)


And now from Vicki....

So Aperture can also be called the f-stop number.  Don't you love it when things have more than one name?  By definition aperture is an opening in an optical instrument that limits the amount of light passing through a lens or onto a mirror.  The diameter of that opening is described as being an f-number.  The higher the f-number the smaller the opening.  The lower the f-number the larger the opening.  I've tried over and over again to make sense of this little tidbit of info.  And here's all I can come up with.  Let's pretend it's Noon on a Saturday and the sun is in full force.  You will probably squint your eyes (aka create a small aperture with your eyelids) to let less of that sun in.  Big sun (f-number) = small eyes (size of opening).  And on the flip side if it's an overcast day you can easily see things with your eyes wide open.  Small amt of sun (f-number) = wide open eyes (size of opening).  Make sense?  Ok here is my example in photographs.  Maybe this will help.

You can see from my examples how the aperture can drastically change not only what is in focus (from Erin's examples) but also what happens when too little or too much light is let in.  Now, here is the one difference with her examples and mine.  She kept her camera in Aperture Priority mode.  Meaning that she wanted to control the f-number and let the camera figure out what the ISO and Shutter Speed needed to be in order to produce a well balanced picture with a focus exactly where she wanted it.  My pictures were taken in Manual Mode with ISO set at 400 and Shutter Speed set at 1/125.  So now that you are thoroughly confused you can see that Photography can really get interesting once you know, understand, and PRACTICE (shouting this to Erin and I) with your camera.  :)  Sure you can point and shoot.  And you can most definitely live in Auto, hey sometimes I do.  But if you were looking to go beyond the norm and experiment then hopefully this blog post has helped you do that.  When I first began studying this trade with an extremely talented and detail oriented photographer, I learned that it is always important to have a fundamental understanding of the basic mechanics. 

No go out there and take those lovely DSLRs out of Auto and experiment!!  And if you are wondering what the little number is in my photo.  Well us Hautop ladies never really sit still for too long.  I said earlier that 2013 was my year of "yes" and that big things were happening......so I decided to start another business!!  Why not, right?!?  I now moonlight (lol, I love using that word) as an Executive Consultant for Rodan + Fields Dermatologists.  The creators of Proactiv are now REDEFINING skincare issues of all types.  And this picture is of the latest and greatest at home treatment tool, the MACRO Exfoliator.  People it's amazing.  And if you want to know more check out my other website, www.vhautop.myrandf.com , or email me at hautopblog@gmail.com.  I'd love to share this tool and all of their product lines with you. 

Comments please!!  We love hearing from our audience.  :)

Next week.....ISO.

Friday, February 15, 2013

let's try this again

So here we are in the midst of an oh-so thrilling subject, Shutter Speed.  Let's start with this disclaimer:  We didn't study art history in school, we don't have certifications from the various national/local programs, but we are 2 lovely ladies who strive each and every (well most) days to take a better picture than we did the day before.  So you may see posts on here that look like planned sessions, and they are.  Email us, we would love to take your pictures!  But what you will also see is that we are constantly learning this trade, trying new things, and challenging ourselves even we when don't feel up for the task.  And we think that has just as much relevance to our audience as does the beautiful photographs that we take for others.  If you are already bored with this post or have no interest in learning along with us how to take your camera out of Auto Mode then you may want to stop here.  lol   Things are about to get serious.

We'll start with what Hautop #1 learned this week....

I am so glad that Vicki and I decided to try the "motion" challenge again!  I was pretty disappointed with the pictures from the prior post but have to say that I am thrilled with the results from this week :-)  But before I start talking about the pictures I wanted to take a second to talk you through my thought process for getting the images.  As I have mentioned before, I spend a great deal of time photographing sports for my kiddos (my son wants to play every sport that we are willing to sign him up for and my daughter is less willing but still being encouraged to participate).  And because I have a nice camera with a big zoom lens, I have become the default team photographer which has given me many opportunities to practice photographing motion.  In nearly every instance for all of their teams, I have concentrated on sharp focus and stopping the motion.  I hate all of those blurry shots where the subject is not clear!  The way that I make sure I "freeze" the motion of the player or ball is to keep my shutter speeds high.  I try very hard to make sure that my shutter speeds stay as close to 1/1000sec or higher as possible (and for clarification, my camera actually just says 1000 when looking at the shutter speed, not 1/1000).  The lower the shutter speed, the more likely you are to have an image where the subject is still showing the motion blur.  Now, it is fairly easy get high shutter speeds on a very sunny day outside, but gets more challenging on dark days or when you are inside.   In those instances, you are going to have to make more camera adjustments to your aperture and ISO (we are going to discuss those items in more detail in the coming weeks).  So, what I want you to try and remember is that you will want high shutter speeds when you are wanting to photograph motion and stop your subject (1000 or higher for me).  If you have a fairly still subject you can use lower shutter speeds, up to a certain point.  Once you get into the really slow shutter speeds you are going to need to use a tripod to prevent blur from camera shake.

Ok, now that I have explained that you want to have high shutter speeds to freeze motion, I am going to break that rule for this assignment.  Because I have been practicing so much with how to stop motion, I wanted to try something a little different.  I had seen images where the subject was fairly focused but the background was blurred from motion and I wondered how to get those kinds of shots.  After reading, it sounded fairly simple, shoot at a lower shutter speed and follow the  motion of the subject (called panning).  Of course, I say simple but I found that it really took a lot of practice and a little luck.  Although my images were far from perfect, my daughter (or at least parts of her body) are fairly focused while the background is blurry from the motion!!  Hurray for success!

Now a little about the shots.  For the first two images of her going down the slide, I switched the camera into shutter priority mode (Tv mode on my canon).  Before explaining my settings, I should tell you that I almost never shoot in this mode because you run the risk of getting the exposure wrong.  Anyway, I  set the shutter speed to 1/15 sec and since it was a sunny day  I shot with a low ISO of 200 and then the camera picked the aperture of 22 for me.

Excited that I was finally able to get panning to work, I decided to try pics of my daughter in dance class.  I kept the camera in shutter priority mode and set the shutter speed to 1/25sec.  Because we were inside, I raised the ISO to 800 and then the camera picked the aperture again, one pic had a aperture of 6.3 and the other was 5.

And finally, I wanted to try a little light writing with glow sticks to say happy Valentine's Day!  This image was a little more complicated and required a darker room, a tripod and some Photoshop!  My husband tried hard to draw a heart in the air and he came close to getting it right :-)  Since he was standing behind the kiddos it was a little tricky!


And then there's Hautop #2....

Ah, back to basics.  One of the very first things I learned about photography was the meaning of the 3 main aspects to every image.  ISO, Aperture, and Shutter Speed.  Sounds fancy but once you break it down it's really not that scary.  :)  They all revolve around how the image is processed in your camera at the time it is taken.  How fast is your "film speed"?  How much light are you letting in?  How much depth of field do you want?  They all interact with one another and if you are brave enough to put your camera in manual mode you will quickly learn how to use them!  And in the process take hundreds of horrible exposed, blurry, and unusable pictures.  Sounds fabulous right.  BUT if you happen to master this skill of manual mode (is this even possible??) then what you will end up with is a perfectly laid out image with the effects that you were looking for.  I have not mastered this art by any means.  But I do find it fun to use.  Caution: before putting your camera in manual or continuous high speed shooting mode you may want to stop by your local Best Buy and pick up an external hard drive.  You will have more images that you know what to do with.


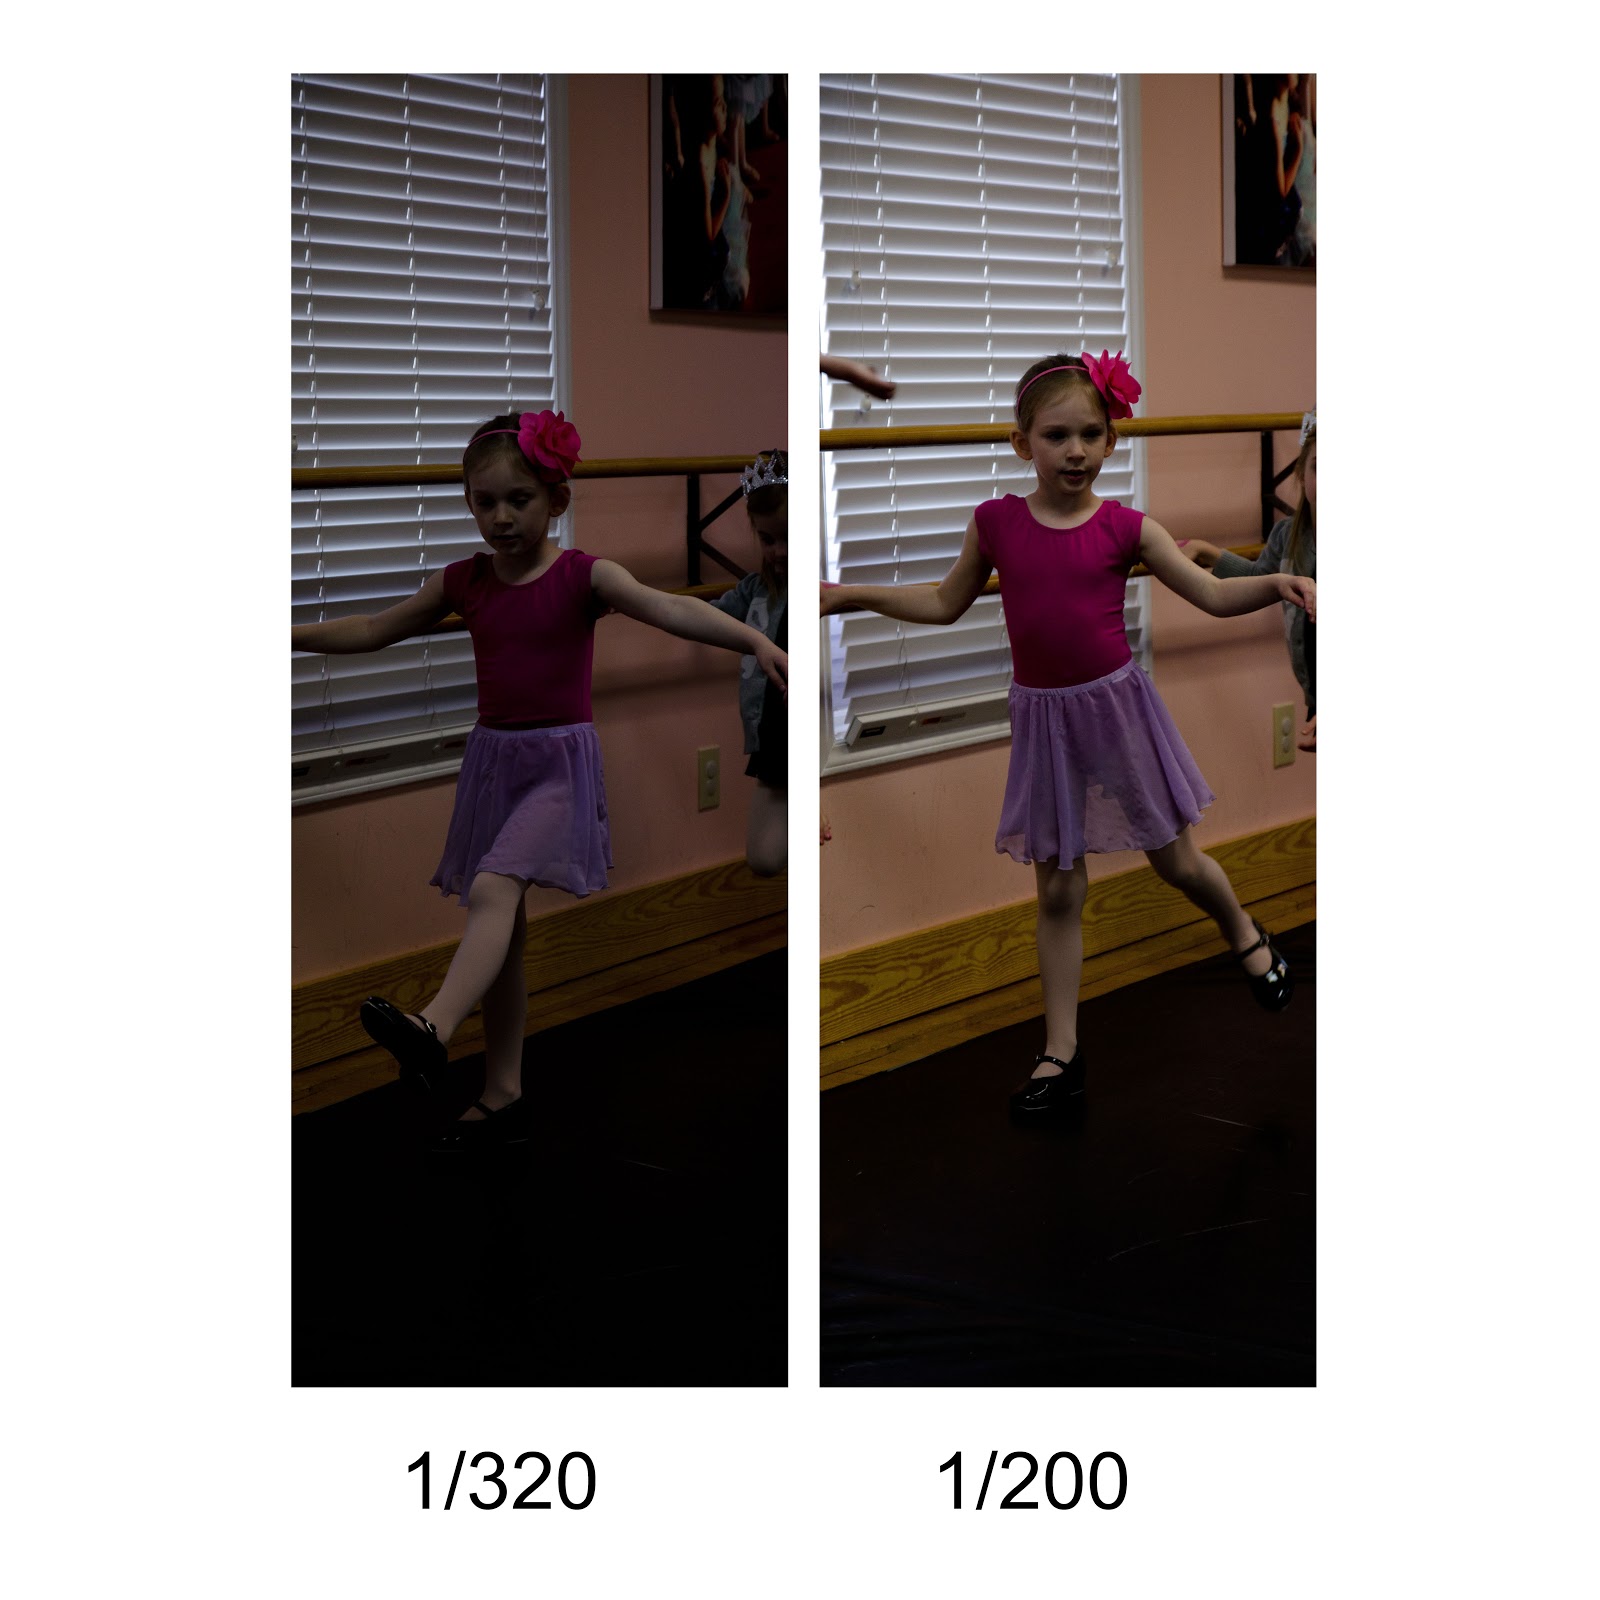
So for this week I wanted to revisit how shutter speed controls the amount of light that is let in through the lens.  And what that means for your photograph.  I did a little experiment in my daughters dance class to work my knowledge of SS.  Keeping 2 (ISO and Aperture) of my 3 settings the same I wanted to see what happened when I changed the SS.    And for anyone out there keeping tabs, I did not use any flash in the photos.  That would have made things waaaay to easy.  lol 

My tests runs....

a fast shutter speed (ex. 1/1000 of a second) means the lens opens and closes so fast a very small amount of light is let in.  So as you see in the first two pictures, while I have a shutter speed of 320 and 200, slower than Erin's 1000, my images are very dark.

a slower shutter speed (ex. 1/60) allows more time for light to enter and your picture will have better exposure. 

Like Erin said before under different natural lighting conditions things can be quite simple.  But I find that putting myself in challenging situations really makes me work hard to use that "ol brain of mine and dust off a few cobwebs.  The easy answers aren't always the best ones.  Wow, sounds like a life lesson. 

On a side note, if there happens to be any professional photographers out there reading our blog....first thank you, and second please feel free to comment.  I'm sure there are better or more insightful ways of explaining this.   

Next week we tackle Aperture.  Several of you have commented on wondering how to get the "blurry background".  We'll talk about the equipment we use and what settings give our pictures that effect.  Until then, message, email, facebook us with  your thoughts. 

Friday, February 8, 2013

Cuteness times 3

Ask yourself this question, "Have I ever seen anything this cute?"  The answer is no, no you have not.   Because I am certain that I have found the most adorable, funny, make-you-want-to-have-a-baby, trio of little girls out there.  The best part is that their beautiful mother is one of my best friends and has been for many years.   It was my lucky day last week when I got to spend the morning laughing and loving on these kiddos! 


If you have been following our blog you will recall our post on black and white photography.   As an update to that, I was personally thrilled when many of these shots converted over to black and white so nicely.  See there, practice does make perfect! 

Also, a big thanks to our readers.  Take Two has pushed well past the 2,000 views mark.  Erin and I are so grateful for the time you have spent with us.  Keep coming back each week.  We've got lots in store for this year!!

hautopblog@gmail.com