We'll start with what Hautop #1 learned this week....
I am so glad that Vicki and I decided to try the "motion" challenge again! I was pretty disappointed with the pictures from the prior post but have to say that I am thrilled with the results from this week :-) But before I start talking about the pictures I wanted to take a second to talk you through my thought process for getting the images. As I have mentioned before, I spend a great deal of time photographing sports for my kiddos (my son wants to play every sport that we are willing to sign him up for and my daughter is less willing but still being encouraged to participate). And because I have a nice camera with a big zoom lens, I have become the default team photographer which has given me many opportunities to practice photographing motion. In nearly every instance for all of their teams, I have concentrated on sharp focus and stopping the motion. I hate all of those blurry shots where the subject is not clear! The way that I make sure I "freeze" the motion of the player or ball is to keep my shutter speeds high. I try very hard to make sure that my shutter speeds stay as close to 1/1000sec or higher as possible (and for clarification, my camera actually just says 1000 when looking at the shutter speed, not 1/1000). The lower the shutter speed, the more likely you are to have an image where the subject is still showing the motion blur. Now, it is fairly easy get high shutter speeds on a very sunny day outside, but gets more challenging on dark days or when you are inside. In those instances, you are going to have to make more camera adjustments to your aperture and ISO (we are going to discuss those items in more detail in the coming weeks). So, what I want you to try and remember is that you will want high shutter speeds when you are wanting to photograph motion and stop your subject (1000 or higher for me). If you have a fairly still subject you can use lower shutter speeds, up to a certain point. Once you get into the really slow shutter speeds you are going to need to use a tripod to prevent blur from camera shake.
Ok, now that I have explained that you want to have high shutter speeds to freeze motion, I am going to break that rule for this assignment. Because I have been practicing so much with how to stop motion, I wanted to try something a little different. I had seen images where the subject was fairly focused but the background was blurred from motion and I wondered how to get those kinds of shots. After reading, it sounded fairly simple, shoot at a lower shutter speed and follow the motion of the subject (called panning). Of course, I say simple but I found that it really took a lot of practice and a little luck. Although my images were far from perfect, my daughter (or at least parts of her body) are fairly focused while the background is blurry from the motion!! Hurray for success!
Now a little about the shots. For the first two images of her going down the slide, I switched the camera into shutter priority mode (Tv mode on my canon). Before explaining my settings, I should tell you that I almost never shoot in this mode because you run the risk of getting the exposure wrong. Anyway, I set the shutter speed to 1/15 sec and since it was a sunny day I shot with a low ISO of 200 and then the camera picked the aperture of 22 for me.


Excited that I was finally able to get panning to work, I decided to try pics of my daughter in dance class. I kept the camera in shutter priority mode and set the shutter speed to 1/25sec. Because we were inside, I raised the ISO to 800 and then the camera picked the aperture again, one pic had a aperture of 6.3 and the other was 5.


And finally, I wanted to try a little light writing with glow sticks to say happy Valentine's Day! This image was a little more complicated and required a darker room, a tripod and some Photoshop! My husband tried hard to draw a heart in the air and he came close to getting it right :-) Since he was standing behind the kiddos it was a little tricky!

And then there's Hautop #2....
Ah, back to basics. One of the very first things I learned about photography was the meaning of the 3 main aspects to every image. ISO, Aperture, and Shutter Speed. Sounds fancy but once you break it down it's really not that scary. :) They all revolve around how the image is processed in your camera at the time it is taken. How fast is your "film speed"? How much light are you letting in? How much depth of field do you want? They all interact with one another and if you are brave enough to put your camera in manual mode you will quickly learn how to use them! And in the process take hundreds of horrible exposed, blurry, and unusable pictures. Sounds fabulous right. BUT if you happen to master this skill of manual mode (is this even possible??) then what you will end up with is a perfectly laid out image with the effects that you were looking for. I have not mastered this art by any means. But I do find it fun to use. Caution: before putting your camera in manual or continuous high speed shooting mode you may want to stop by your local Best Buy and pick up an external hard drive. You will have more images that you know what to do with.
So for this week I wanted to revisit how shutter speed controls the amount of light that is let in through the lens. And what that means for your photograph. I did a little experiment in my daughters dance class to work my knowledge of SS. Keeping 2 (ISO and Aperture) of my 3 settings the same I wanted to see what happened when I changed the SS. And for anyone out there keeping tabs, I did not use any flash in the photos. That would have made things waaaay to easy. lol
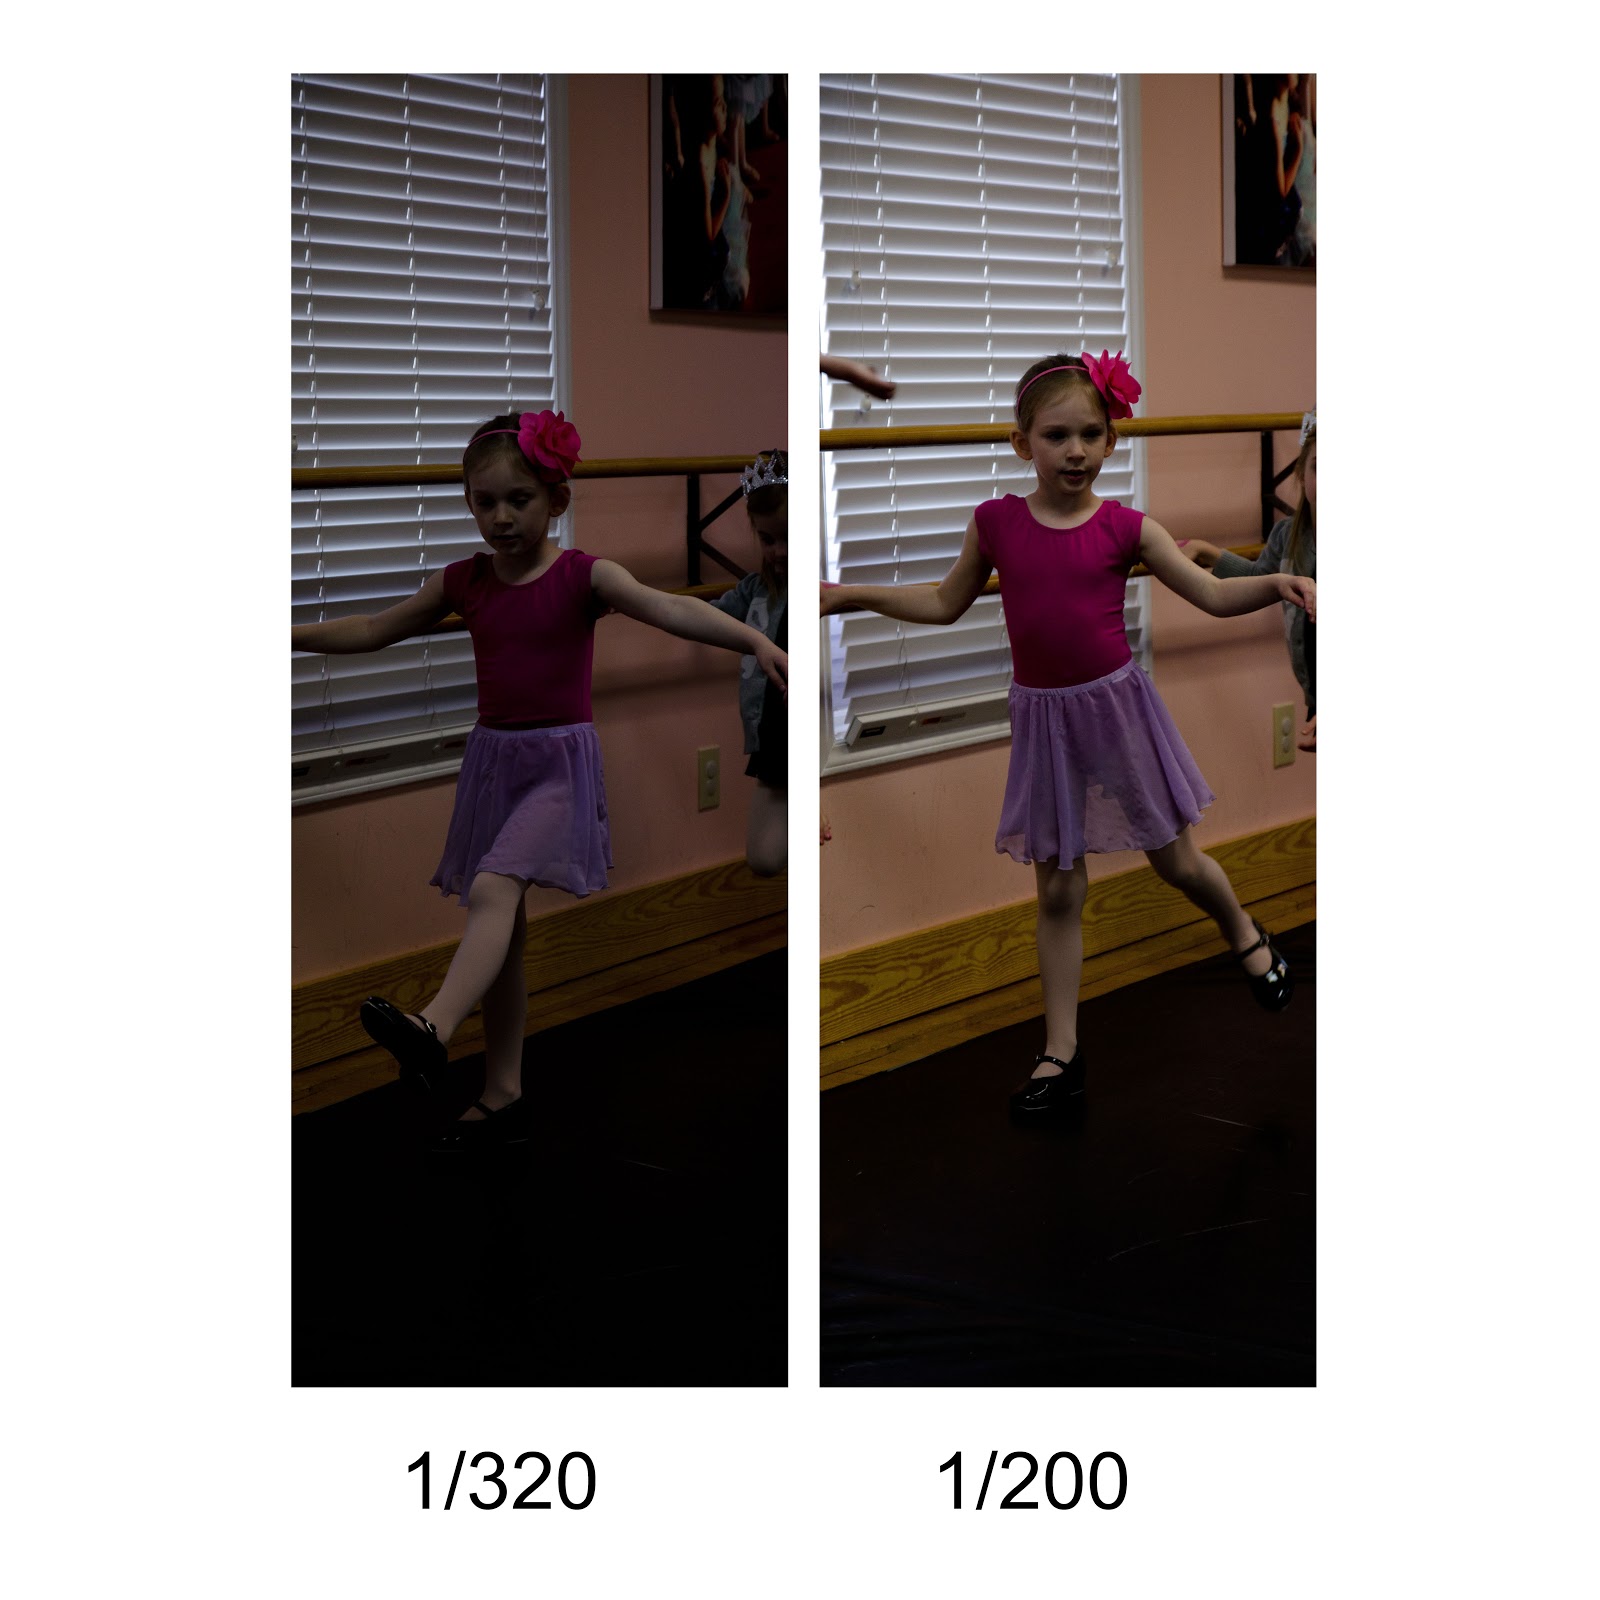
My tests runs....
a fast shutter speed (ex. 1/1000 of a second) means the lens opens and closes so fast a very small amount of light is let in. So as you see in the first two pictures, while I have a shutter speed of 320 and 200, slower than Erin's 1000, my images are very dark.
a slower shutter speed (ex. 1/60) allows more time for light to enter and your picture will have better exposure.

Like Erin said before under different natural lighting conditions things can be quite simple. But I find that putting myself in challenging situations really makes me work hard to use that "ol brain of mine and dust off a few cobwebs. The easy answers aren't always the best ones. Wow, sounds like a life lesson.
On a side note, if there happens to be any professional photographers out there reading our blog....first thank you, and second please feel free to comment. I'm sure there are better or more insightful ways of explaining this.
Next week we tackle Aperture. Several of you have commented on wondering how to get the "blurry background". We'll talk about the equipment we use and what settings give our pictures that effect. Until then, message, email, facebook us with your thoughts.
No comments:
Post a Comment