Friday, February 22, 2013

Aperture and the movie ted....

Our second lesson of the "back to basics" series is on Aperture.  It's nice every once and a while to review what you think you already know.  I find that most often I get more out of a lesson or story the second time around.  Especially movies, for instance the movie "ted".  I had the pleasure of watching that beauty three times.  And each time I picked up on more and more awful parts that I had fortunately missed the previous viewing.  How does this relate to Aperture?  It doesn't.  Well kind of, what I mean to say is hopefully if you know a little about aperture you'll know a little more after this blog.  Or if you didn't then it's a good starting point. 
 
Ok, lets start with Erin.....
I don't know about you, but I sure am ready for spring to arrive!!  We have more "threatening" winter weather and once again schools have decided to open on a delay!  It was the best news when I was a kid but now that I am officially "old" it is simply a huge pain in the booty :-)  So, as I was trying to find a subject for this week's challenge I found myself looking longingly at the one sign of spring in our yard...tiny little white flowers on a scraggly shrub.  Not much to look at but it leaves me clinging to hope for more beauty to arrive!!  Anyway, I took several images of this poor little shrub to try and demonstrate the impact that changing your aperture can have on your pictures.  Before talking about the images, I should tell you that I did take the pictures with my 70-200mm,  2.8 lens.

This first image was shot at an aperture of 2.8 and the second image was set to an aperture of 18.

 So, what you can see immediately is that the image with the lower aperture (2.8) has most of the background out of focus while the image with the high aperture (18) has more of the background in focus.  So, if you want those fun "background out of focus" pictures all you need to do is lower your aperture.  Sounds easy enough, right?  Well, here is the one thing to keep in mind...your aperture is dependent on your lens (not your camera).  If you have a intro level DSLR camera with a kit lens (the lens that came with the camera), then you likely will not be able to lower your aperture to 2.8 like I did in the first image.  Sadly, you will have to buy another lens...sorry to be the bearer of bad news!  But you can still take time to lower your aperture as much as your lens will allow and shoot away :-)
As I have been learning more about photography, I have have found that aperture priority mode (Av on my canon) has been my new friend.  I shoot in this mode a great deal of the time because it allows me to easily change and control my aperture.  The one time I will caution you to change from this mode is when you are using a flash outside...you will end up with a freakishly white image.  

Now before I completely leave winter behind, I wanted to share my two beautiful kiddos enjoying the winter weather!!  Thanks for reading :-)


And now from Vicki....

So Aperture can also be called the f-stop number.  Don't you love it when things have more than one name?  By definition aperture is an opening in an optical instrument that limits the amount of light passing through a lens or onto a mirror.  The diameter of that opening is described as being an f-number.  The higher the f-number the smaller the opening.  The lower the f-number the larger the opening.  I've tried over and over again to make sense of this little tidbit of info.  And here's all I can come up with.  Let's pretend it's Noon on a Saturday and the sun is in full force.  You will probably squint your eyes (aka create a small aperture with your eyelids) to let less of that sun in.  Big sun (f-number) = small eyes (size of opening).  And on the flip side if it's an overcast day you can easily see things with your eyes wide open.  Small amt of sun (f-number) = wide open eyes (size of opening).  Make sense?  Ok here is my example in photographs.  Maybe this will help.

You can see from my examples how the aperture can drastically change not only what is in focus (from Erin's examples) but also what happens when too little or too much light is let in.  Now, here is the one difference with her examples and mine.  She kept her camera in Aperture Priority mode.  Meaning that she wanted to control the f-number and let the camera figure out what the ISO and Shutter Speed needed to be in order to produce a well balanced picture with a focus exactly where she wanted it.  My pictures were taken in Manual Mode with ISO set at 400 and Shutter Speed set at 1/125.  So now that you are thoroughly confused you can see that Photography can really get interesting once you know, understand, and PRACTICE (shouting this to Erin and I) with your camera.  :)  Sure you can point and shoot.  And you can most definitely live in Auto, hey sometimes I do.  But if you were looking to go beyond the norm and experiment then hopefully this blog post has helped you do that.  When I first began studying this trade with an extremely talented and detail oriented photographer, I learned that it is always important to have a fundamental understanding of the basic mechanics. 

No go out there and take those lovely DSLRs out of Auto and experiment!!  And if you are wondering what the little number is in my photo.  Well us Hautop ladies never really sit still for too long.  I said earlier that 2013 was my year of "yes" and that big things were happening......so I decided to start another business!!  Why not, right?!?  I now moonlight (lol, I love using that word) as an Executive Consultant for Rodan + Fields Dermatologists.  The creators of Proactiv are now REDEFINING skincare issues of all types.  And this picture is of the latest and greatest at home treatment tool, the MACRO Exfoliator.  People it's amazing.  And if you want to know more check out my other website, www.vhautop.myrandf.com , or email me at hautopblog@gmail.com.  I'd love to share this tool and all of their product lines with you. 

Comments please!!  We love hearing from our audience.  :)

Next week.....ISO.

Friday, February 15, 2013

let's try this again

So here we are in the midst of an oh-so thrilling subject, Shutter Speed.  Let's start with this disclaimer:  We didn't study art history in school, we don't have certifications from the various national/local programs, but we are 2 lovely ladies who strive each and every (well most) days to take a better picture than we did the day before.  So you may see posts on here that look like planned sessions, and they are.  Email us, we would love to take your pictures!  But what you will also see is that we are constantly learning this trade, trying new things, and challenging ourselves even we when don't feel up for the task.  And we think that has just as much relevance to our audience as does the beautiful photographs that we take for others.  If you are already bored with this post or have no interest in learning along with us how to take your camera out of Auto Mode then you may want to stop here.  lol   Things are about to get serious.

We'll start with what Hautop #1 learned this week....

I am so glad that Vicki and I decided to try the "motion" challenge again!  I was pretty disappointed with the pictures from the prior post but have to say that I am thrilled with the results from this week :-)  But before I start talking about the pictures I wanted to take a second to talk you through my thought process for getting the images.  As I have mentioned before, I spend a great deal of time photographing sports for my kiddos (my son wants to play every sport that we are willing to sign him up for and my daughter is less willing but still being encouraged to participate).  And because I have a nice camera with a big zoom lens, I have become the default team photographer which has given me many opportunities to practice photographing motion.  In nearly every instance for all of their teams, I have concentrated on sharp focus and stopping the motion.  I hate all of those blurry shots where the subject is not clear!  The way that I make sure I "freeze" the motion of the player or ball is to keep my shutter speeds high.  I try very hard to make sure that my shutter speeds stay as close to 1/1000sec or higher as possible (and for clarification, my camera actually just says 1000 when looking at the shutter speed, not 1/1000).  The lower the shutter speed, the more likely you are to have an image where the subject is still showing the motion blur.  Now, it is fairly easy get high shutter speeds on a very sunny day outside, but gets more challenging on dark days or when you are inside.   In those instances, you are going to have to make more camera adjustments to your aperture and ISO (we are going to discuss those items in more detail in the coming weeks).  So, what I want you to try and remember is that you will want high shutter speeds when you are wanting to photograph motion and stop your subject (1000 or higher for me).  If you have a fairly still subject you can use lower shutter speeds, up to a certain point.  Once you get into the really slow shutter speeds you are going to need to use a tripod to prevent blur from camera shake.

Ok, now that I have explained that you want to have high shutter speeds to freeze motion, I am going to break that rule for this assignment.  Because I have been practicing so much with how to stop motion, I wanted to try something a little different.  I had seen images where the subject was fairly focused but the background was blurred from motion and I wondered how to get those kinds of shots.  After reading, it sounded fairly simple, shoot at a lower shutter speed and follow the  motion of the subject (called panning).  Of course, I say simple but I found that it really took a lot of practice and a little luck.  Although my images were far from perfect, my daughter (or at least parts of her body) are fairly focused while the background is blurry from the motion!!  Hurray for success!

Now a little about the shots.  For the first two images of her going down the slide, I switched the camera into shutter priority mode (Tv mode on my canon).  Before explaining my settings, I should tell you that I almost never shoot in this mode because you run the risk of getting the exposure wrong.  Anyway, I  set the shutter speed to 1/15 sec and since it was a sunny day  I shot with a low ISO of 200 and then the camera picked the aperture of 22 for me.

Excited that I was finally able to get panning to work, I decided to try pics of my daughter in dance class.  I kept the camera in shutter priority mode and set the shutter speed to 1/25sec.  Because we were inside, I raised the ISO to 800 and then the camera picked the aperture again, one pic had a aperture of 6.3 and the other was 5.

And finally, I wanted to try a little light writing with glow sticks to say happy Valentine's Day!  This image was a little more complicated and required a darker room, a tripod and some Photoshop!  My husband tried hard to draw a heart in the air and he came close to getting it right :-)  Since he was standing behind the kiddos it was a little tricky!


And then there's Hautop #2....

Ah, back to basics.  One of the very first things I learned about photography was the meaning of the 3 main aspects to every image.  ISO, Aperture, and Shutter Speed.  Sounds fancy but once you break it down it's really not that scary.  :)  They all revolve around how the image is processed in your camera at the time it is taken.  How fast is your "film speed"?  How much light are you letting in?  How much depth of field do you want?  They all interact with one another and if you are brave enough to put your camera in manual mode you will quickly learn how to use them!  And in the process take hundreds of horrible exposed, blurry, and unusable pictures.  Sounds fabulous right.  BUT if you happen to master this skill of manual mode (is this even possible??) then what you will end up with is a perfectly laid out image with the effects that you were looking for.  I have not mastered this art by any means.  But I do find it fun to use.  Caution: before putting your camera in manual or continuous high speed shooting mode you may want to stop by your local Best Buy and pick up an external hard drive.  You will have more images that you know what to do with.


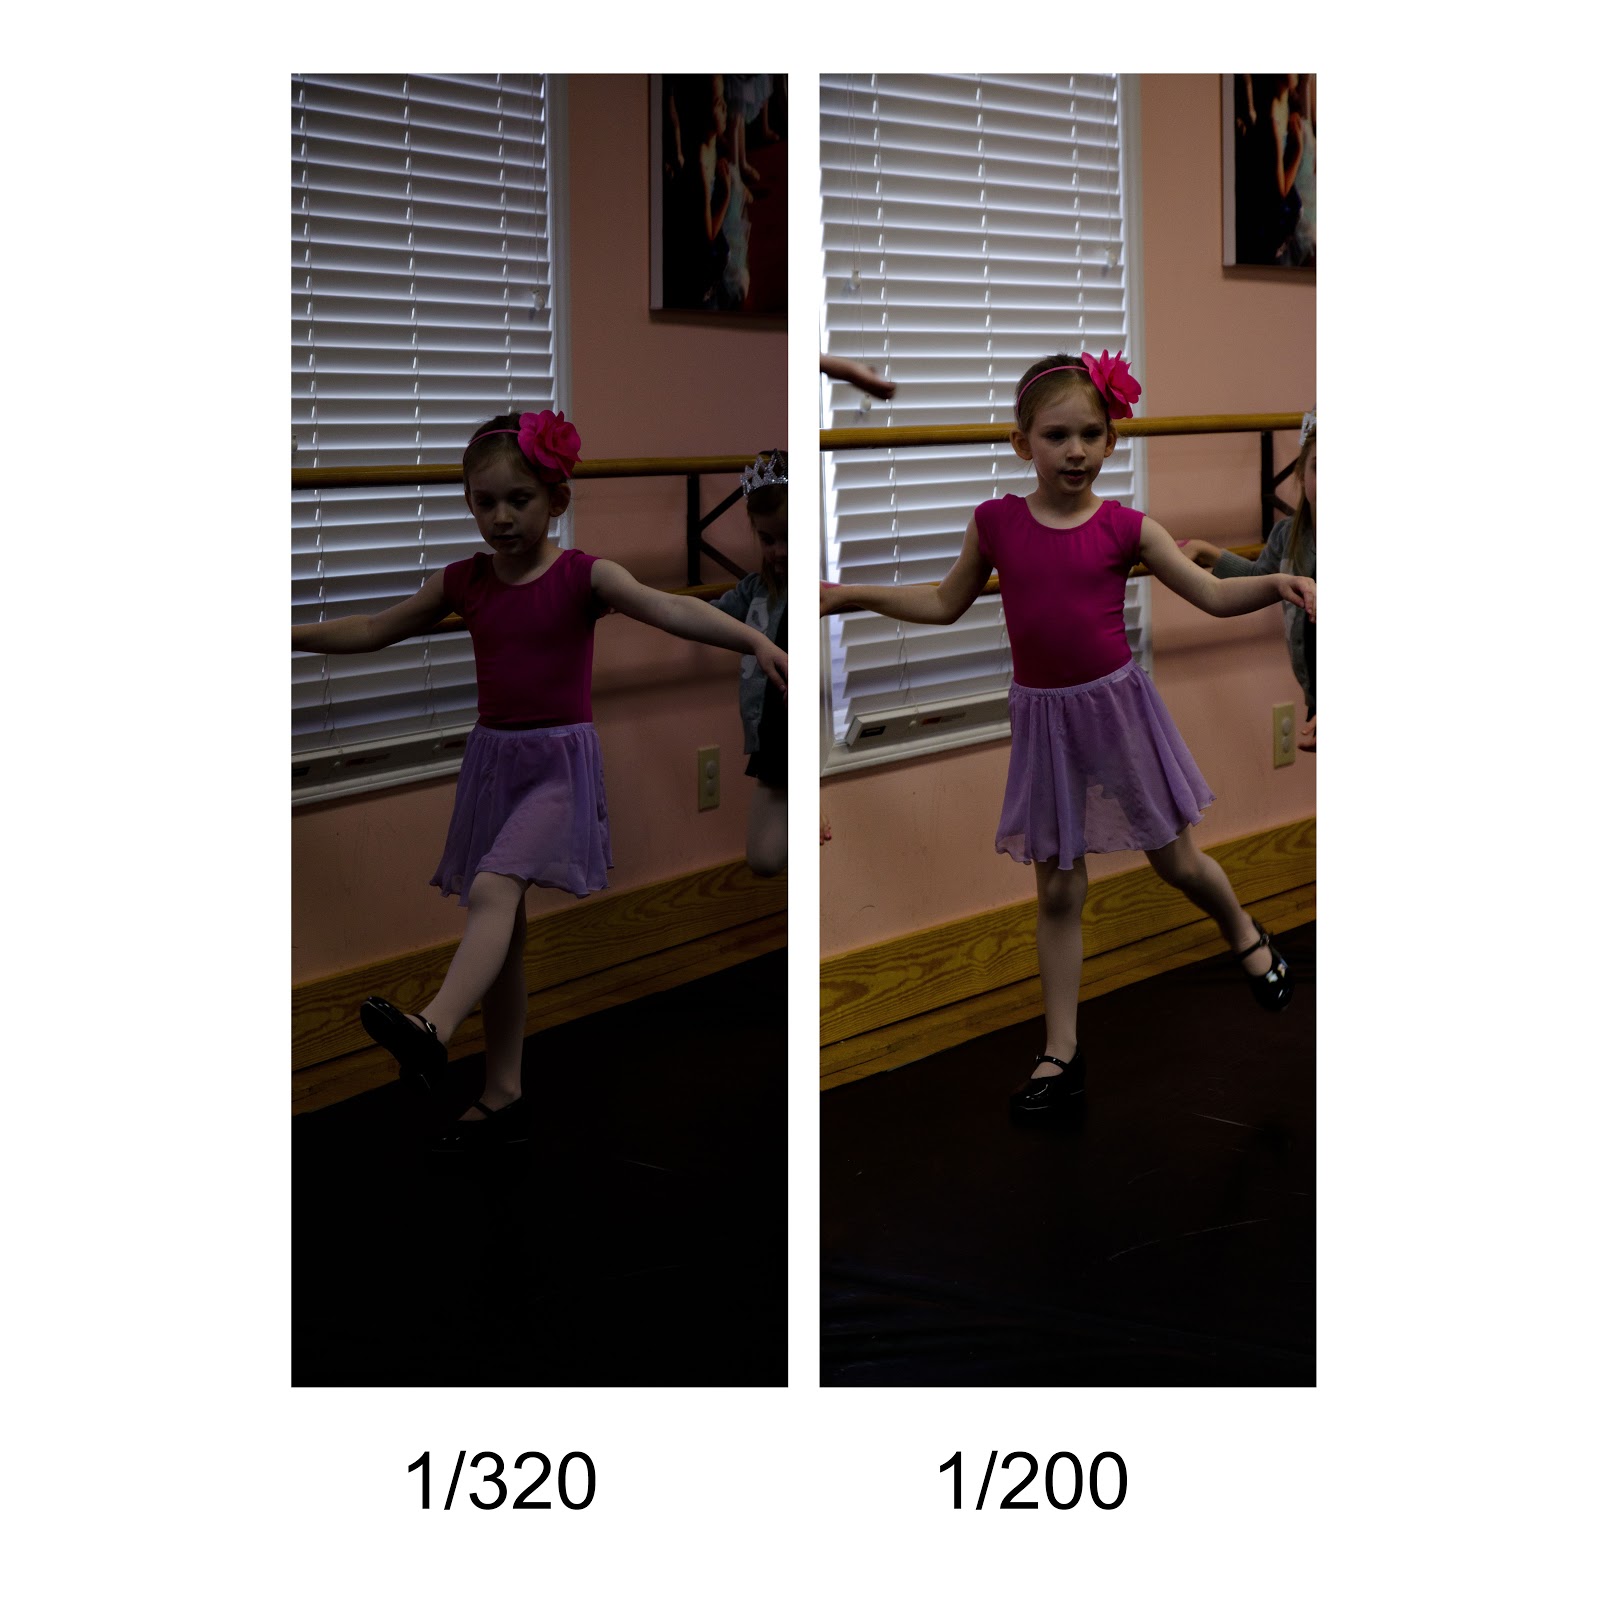
So for this week I wanted to revisit how shutter speed controls the amount of light that is let in through the lens.  And what that means for your photograph.  I did a little experiment in my daughters dance class to work my knowledge of SS.  Keeping 2 (ISO and Aperture) of my 3 settings the same I wanted to see what happened when I changed the SS.    And for anyone out there keeping tabs, I did not use any flash in the photos.  That would have made things waaaay to easy.  lol 

My tests runs....

a fast shutter speed (ex. 1/1000 of a second) means the lens opens and closes so fast a very small amount of light is let in.  So as you see in the first two pictures, while I have a shutter speed of 320 and 200, slower than Erin's 1000, my images are very dark.

a slower shutter speed (ex. 1/60) allows more time for light to enter and your picture will have better exposure. 

Like Erin said before under different natural lighting conditions things can be quite simple.  But I find that putting myself in challenging situations really makes me work hard to use that "ol brain of mine and dust off a few cobwebs.  The easy answers aren't always the best ones.  Wow, sounds like a life lesson. 

On a side note, if there happens to be any professional photographers out there reading our blog....first thank you, and second please feel free to comment.  I'm sure there are better or more insightful ways of explaining this.   

Next week we tackle Aperture.  Several of you have commented on wondering how to get the "blurry background".  We'll talk about the equipment we use and what settings give our pictures that effect.  Until then, message, email, facebook us with  your thoughts. 

Friday, February 8, 2013

Cuteness times 3

Ask yourself this question, "Have I ever seen anything this cute?"  The answer is no, no you have not.   Because I am certain that I have found the most adorable, funny, make-you-want-to-have-a-baby, trio of little girls out there.  The best part is that their beautiful mother is one of my best friends and has been for many years.   It was my lucky day last week when I got to spend the morning laughing and loving on these kiddos! 


If you have been following our blog you will recall our post on black and white photography.   As an update to that, I was personally thrilled when many of these shots converted over to black and white so nicely.  See there, practice does make perfect! 

Also, a big thanks to our readers.  Take Two has pushed well past the 2,000 views mark.  Erin and I are so grateful for the time you have spent with us.  Keep coming back each week.  We've got lots in store for this year!!

hautopblog@gmail.com

Tuesday, January 29, 2013

Ready, set, action...

Have you ever tried something and it didn't turn out quite as you expected?   You know, the whole "A for effort" deal but really it's back to the drawing board.  Well that basically sums up the challenge for this week.  We set out to capture motion.  And we did, it just didn't turn out as pretty as we expected.  The same thing usually happens when I try to bake from-scratch cookies.  lol  So here are our motion pics, blurry and all. 

On a brighter note, Take Two is spending the upcoming weekend together.  Holla!  So we are going to take our failing grade for this week and do a little homework.  Stay tuned, round 2 of motion is in the works!!


Pictures below from Erin:


I set out this week wanting to capture a picture of a moving subject that had one of those awesome motion trails behind them.  All the tutorials told me to slow the shutter speed, and move my camera with the moving subject.  Ugh!  What I ended up with were horrifically blurry, completely unusable shots.  And it wasn't for a lack of trying!!  The first one above of my son at his basketball game was definitely the best of the worst.  At least in this picture you can tell that it is him dribbling the basketball and get a sense of the motion.  But ultimately, I don't think that it looks creative enough to warrant all the work I went through to get it.  So, I am going to stick with freezing the motion, at least for my sports shots.  I do still love the light motion pictures...like the ones that show blurred car lights in a city scene or light painting like they do in weddings.  Maybe I will have to try those next time :-)


Picture below by Vicki:

Remember last week when I wrote about the when the stars align?  I was thinking that would happen this particular afternoon.  Beautiful backdrop, running horses, sunset.  What could go wrong?   For starters I clearly need a few more hours (read days/months/years) of practicing with my new camera.  My buttons are in new places, the functionality on the new camera is twice that of my old.  I have a small idea of what I'm doing here people.  That perfect moment doesn't generally happen twice and well you just can't get lucky every time.  :)  But that's cool.  We will just try this little challenge again until we get it right! 

I was all over the place with my settings on this series of images.  The shot above was taken at 1/1000 sec, ISO 400, and f/4.0.  For me it is grainy and the lighting is horrible.  My subject is backlit thanks to the sunset.  My external flash (which I wasn't using) might have helped brighten up the shot, but chances of it providing enough light are slim.  You would basically need a football field light for that not something powered by 4 AA batteries.  You see the motion in their tails but that's about it.  These are 2 of my parent's horses.  Next time I am back home I'll try shooting them from the fence line you see in the background.  I'll lose the sunflare effect, which I personally like, but might have a better chance of actually being able to see the horses. 

Have suggestions?  Want to follow along?  Send us your comments!  We would love to hear from you.  hautopblog@gmail.com

Wednesday, January 23, 2013

Get ready...

What happens when you put together some amazingly adorable kiddos in some absolutely awesome clothes?  The perfect photo shoot :-)  I had such a great time photographing all of these beautiful children for the new launch of the spitter spatter website.  This company is the brain child of my brother in law, Zach Schabot, and his business partner Angela Hollen and they make anti-microbial, stain resistant clothing for  children...genius! The new website should go live sometime soon so keep checking in and learn more.  

www.spitterspatter.com

Erin


Tuesday, January 22, 2013

Starting off 2013 on a high!

It's a moment we all live for, that one shot where all the "stars" align.  You know, happy kid, blue sky, gorgeous backdrop.   And on this very warm day in January I met my wonderful friends and their insanely cute son at the park for such a moment.  :)   We had so much fun enjoying the quiet morning and celebrating a very belated birthday for Mr. B!  I'm so glad we waited for the perfect day and I think you will agree.....


 Take Two is making this our best year yet!  Thanks so much Joe and Jenn for getting us started off right!

~VICKI~
hautopblog@gmail.com


Tuesday, January 15, 2013

Sisters from a different Mister.....

Crazy how this world works.  Are you one of those people that believe all things happen for a reason?  That by some devine intervention, timing of events and the goings-on in your life are meant to be exactly the way they are?  Whether positive or negative?  I am.  I have had a couple of random connections swirling around me the past few weeks.  So when Erin and I met this morning to create our post I nearly lost my coffee to find that we had taken (essentially) the EXACT same photos for this week!  This may not have been clear before but we do not discuss what we are shooting during these challenges.  We keep that part secret from one another and only discuss the category and parameters around editing.  We like that because it pushes us to be personally creative and makes for great discussion after the fact.  It is now clear to me that we are without a doubt Sisters from another Mister!  Either that or we are becoming incredibly insync with our passion for learning this trade.  Both of which make me smile.  :)  Continue reading and you'll see what I am talking about....


Pictures below from Vicki:


I love looking at black and white photography.  It seems to tell such a strong story and show a real sense of emotion.  But I am often torn when I have a photograph full of beautiful colors and try converting it to B/W.  So one of my "goals" this year is to learn more about B/W images.  What makes them so telling and how to properly take an image and convert it over.  All week long I was debating over what I wanted these pictures to look like.  I couldn't really find anything that suited me....until Friday.  Friday was the most dreary, nasty day we have had in a while here in Charlotte.  The kind that makes your hair all crazy and everything slippery for no reason!  As I'm pulling into my driveway that afternoon Tiny Hautop #1 says "Mommy this looks like the misty forest."  One of her fav Backyardagains episodes.   She is so right.  The fog was so thick that it had sucked all of the color out of the trees and sky.  And suddenly my B/W challenge had begun!  Big hair and all I grabbed the camera and decided to start snapping.   The two tree images are from my yard that day.  And are straight out of the camera.  Taken at 1/25, f4.5, and ISO 400.  You know I love trees from previous blogs.  :)  I found the stark contrast of the sky and the trees to be perfect!  After some thought however it seemed like I had cheated on the challenge.  I mean the whole point to was to convert an image.  And I had a great B/W pic but had not technically converted it.  So for good measure I threw in a pic from my trip to the park early Sunday morning.  I met some great friends and their insanely cute 1yr old son for a session.  You'll see them later this week in a post.  During that time I actually found a blooming tree!!  Now these blooms were a soft pink and absolutely gorgeous.  I teared up a bit converting the image but I've always been a rule follower.  So I changed it to B/W and completed my homework assignment.  lol  I actually like it.  I think the change really shows off the details in the petals.  This image was shot at 1/400, f2.8, ISO 400.    That's all for this week.  I will probably revisit this challenge in a few weeks.  Practice makes perfect!

Images below from Erin:


This week, I was forced to step out of my comfort zone when my first plan for this challenge did not pan out.  I have learned over this journey that my joy is photographing people, and more than that, photographing people doing things they love.  I have a hard time with posed photography too because it feels so forced and I would rather let people be themselves and stand back to capture their true selves.  I suppose that's why I enjoy sports and playtime family sessions most of all.  So, my original plan had been to take pictures at my son's basketball game.  If you know me at all, you know that I have my camera with me at any and all sporting events that my kids are involved in playing.  On top of that, I am the team photographer for many of their sports.  Sadly, basketball has stopped me dead in my tracks!  Why you ask?  The lighting is absolutely terrible to the point where my only option is to raise my ISO (film speed in the days of film) so high that all the shots are incredibly grainy.  I was so sad because I LOVE the game of basketball and to add to it, Brett (my husband) is coaching and I thought it would be fun to have lots of pictures from the season.  I took the camera to the first game and was so discouraged that I have not taken it with me since.  When Vicki suggested B&W for this week, I immediately thought that maybe switching the pictures to B&W might take some of the focus off of the grain.  Sadly,  life simply got in the way on Saturday and I was not able to take the pictures as planned. So, that left me one day to figure out what would be my new focus!  Luck would have it that I woke up Sunday morning to everything covered in a fairly dense fog.  Looking out my window I thought that maybe the fog and nature would be a fun thing to photograph for the challenge.  So, I forced myself out of bed and into the car to the park in the neighborhood with a cute little pond.  Since I was up early the water was completely calm and made for some great reflections.  Although I felt like a "real" photographer up early with all of my gear and in the "elements" with nothing but me and my camera, I think I will leave this type of photography to someone else and stick with what I love :-)  
 
 
And there you have it folks.  Great minds do think alike!  For next week we both have some fun session images to post.  So our weekly challenge is going to be 2 weeks out.  We will be capturing motion.  Get ready to crank up those shutter speeds!  Send us a shout out if you would like to follow along or submit your fav black and white photo!  We would LOVE to hear from you!
 
Erin and Vicki